Table of Contents
Android
HTC Desire Z

 Work in progress
Do not use
Work in progress
Do not use
HTC Desire ZHTC Desire Z
Gain temporary root and create Backup on HTC Desire Z Android 2.3
On Linux:
adb push fre3vo   /data/local/tmp
adb install Superuser.apk
# from Vision-fre3vo-temp-root.zip
adb push su       /data/local/tmp
adb push fixsu.sh /data/local/tmp
adb push busybox  /data/local/tmp
adb shell
In adb shell:
chmod 777 /data/local/tmp/fre3vo
/data/local/tmp/fre3vo -debug -start FAA90000 -end FFFFFFFF
Dropping back to Linux!
~ $ adb shell
# /data/local/tmp/fixsu.sh
# exit
Yeah, this time it's root! Now run Titanium Backup *root* and save everything to SD Card!
Downgrade HTC Desire Z to Android 2.2
see Google 
/data/local/tmp/misc_version -s 1.33.405.5
Root and ugrade HTC Desire Z to Android 2.3
On Linux:
adb push psneuter /data/local/tmp/
adb push hboot-eng.img /data/local/tmp/
adb push busybox /data/local/tmp/
adb push flashgc /data/local/tmp/
adb push gfree /data/local/tmp/
adb push root_psn /data/local/tmp/
adb push recovery-clockwork-touch-5.8.1.0-vision.img /data/local/tmp/recovery.img
adb push su /sdcard/
adb push Superuser.apk /sdcard/
adb shell
In adb Shell:
chmod 755 /data/local/tmp/*
/data/local/tmp/psneuter
In Linux:
adb shell
In adb Shell (note the '#' sign):
cd /data/local/tmp
./gfree -f -b hboot-eng.img -y recovery.img
./root_psn
sync
References:
Use QR Code to configure Wifi Access
To get WifiWifi access by use of common QR CodeQR Code scanning apps, you have to QR encode the string
WIFI:S:MySSID;T:WPA2;P:MyPassword;;
which can be generated with the open source tool qrencode:
qrencode -t PNG -s 12 -l L -o MyNetwork.png 'WIFI:S:MySSID;T:WPA;P:MyPassword;;'
 Apart from replacing MySSID and MyPassword by the right values for your network, you might need to replace WPA by WEP. I was told, a WPA2 might work as well, but WPA seems to be generic for both WPA and WPA2.
For a hidden network, a H:true is expecte as a last value, seperated by another ; and finished by a pair of them. In case of no password (no encryption), just omit the respective tags completely1).
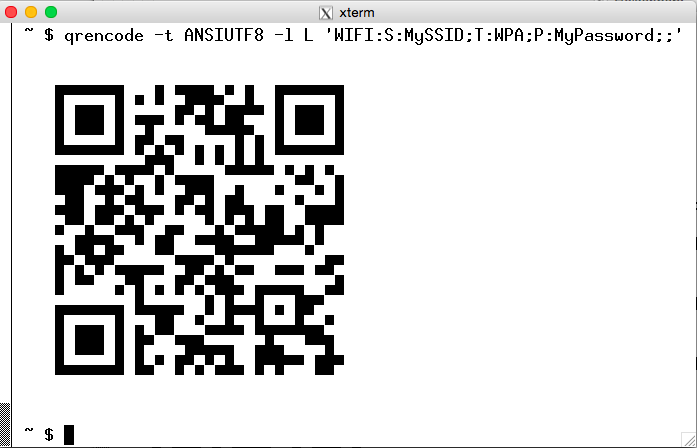
qrencode -t ANSIUTF8 -l L 'WIFI:S:MySSID;T:WPA;P:MyPassword;;'
References:
- Tries with the QR Code generator from the ZXing project
Thanks to Generate QR Codes for WiFi networks for pointing out the basiscs.
Wileyfox Swift
Install TWRP 3.0.2 unofficial on Wileyfox Swift
Some time ago, I found an unofficial build of TWRPTWRP for the Wileyfox SwiftWileyfox Swift (crackling): TWRP_3.0.2-0_crackling_20160524.zip
Steps done:
- Enable developer options/tools on phone
- Enable adb on phone
- Enable oem unlock on phone
- Extract recovery.img from TWRP_3.0.2-0_crackling_20160524.zip
- Boot Wileyfox Swift into fastboot
- Connect by USB
- Run
fastboot oem unlock
fastboot -i 0x2970 oem unlock-go
fastboot oem unlock-go
on connected computer
- Run
fastboot flash recovery recovery.img
on connected computer
- Reboot by command
fastboot boot recovery.img
on connected computer3)
- Reboot or shutdown from TWRP Menu
Transfer system from one Wileyfox Swift to another with TWRP
This is a guide to transfer an Android system to a new hardware of the same type in case the old hardware is somewhat broken, but the system ist still running.
This will not work as described to transfer the system to different hardware.
- Install TWRP on both systems (see above)
- Put old phone into flight mode to avoid sync operations during backup and restore
- Boot old phone into recovery mode
- Check time and timezone, select correct timezone eventually
- Connect computer via USB and backup all data from internal storage to computer by mtp
- Select “Backup”
- Select storage “MicroSD”
- Select partitions for backup
- System
- Data
- Boot
- Start Backup
- After backup finished, shutdown old phone by choosing Power off from the Reboot Menu
- Move all SIM cards and the SD card from old phone to new one4)
- Boot new phone directly into recovery mode by pressing Volume down and Power, let go after approx. 5 seconds.
- Check time and timezone, select correct timezone eventually
- Select Terminal from TWRP menu
or
Connect to computer by USB and run adb shell - Set current time by running
date -s YYYYMMDDHHMM00
on phone
- Do a dummy backup of some small partition (e.g. boot) to get TWRP subdirectory name of new phone
- Find new subdirectory either in
/sdcard/TWRP/BACKUPor in/sdcard1/TWRP/BACKUP - Rename
/sdcard1/TWRP/BACKUP/<old name>
to
/sdcard1/TWRP/BACKUP/<new name> - Select Wipe → Advanced Wipe
- Select5)
- Dalvik / ART Cache
- System
- Data
- Internal Storage
- Cache
- Start Wiping by Swipe to Wipe
- Select Restore
- Select storage “MicroSD”
- Select most recent backup
- Select partitions to be restored:
- System
- Data
- Boot
- Wait for restore to finish
- Connect computer via USB and restore all data to internal storage from computer by mtp
- Reboot into System via the Reboot menu.
- Connect to computer by USB
- On connected computer run6)
adb shell date YYYYMMDD.HHMM00
- Reboot new phone
- Check date and time on new phone
- Have fun!
Upgrad from CyanogenOS to Android
Change disk encryption PIN on Android 7.2.1 Nougat
adb shell
su
vdc cryptfs changepw pin <old> <new>
Install F-Droid Privilege Extension systemless
(e.g. needed for system on sqashfs which can not be modified by TWRP)
- Install Magisk
- Install Magisk Systemizer extension
- Download F-Droid Privilege Exteion APK. (downloading, not installing!)
- connect via USB from PC and run
adb shell
su
cd /sdcard/Download
systemizer
- Select “Install from APK”
- Enter filename of apk
- Choose destination
/system/priv-app/ - Reboot Phone
Install LineageOS 14.1
Installing the LineageOS 14.1 update.zip on Android 7.2.1 Nougat following the simple7) update process did not work for me.
Install everything (but System) from Cyanogen 13.1.2 via fastboot first:
unzip cm-13.1.2-ZNH2KAS3LG-crackling-signed-fastboot-84f0d5200b.zip \
      NON-HLOS.bin hyp.mbn emmc_appsboot.mbn rpm.mbn tz.mbn sbl1.mbn \
      splash.img flash-radio.sh cache.img userdata.img boot.img recovery.img \
      android-info.txt filesmap
su -
for file in boot.img cache.img recovery.img userdata.img ; do fastboot flash "${file%.img}" "$file" ; sleep 1 ; done
Depending where you came from (i.e. what has been the previous OS Revision on the phone) you might want to flash further firmware:
./flash-radio.sh
Then reboot the Swift into the new fastboot:
fastboot reboot-bootloader
In fastboot, boot TWRP:
fastboot boot twrp-3.2.3-0-crackling.img
exit # finish su
In TWRP select “Advanced”, then “ADB Sideload”.
You might want to tick “Wipe Dalvik Cache” and “Wipe Cache” to avoid problems due to cache inconsistency. Then start the sideload mode by doing the “Swipe to Start Sideload”
Then install Lineage from PC8)
adb sideload lineage-14.1-20180905-nightly-crackling-signed.zip
In TWRP select “Reboot System”
After reboot, wait for the installation process to finish. (If you think, its stuck - keep waiting provided the animated LineageOS Logo is still running)
If you want to have root for apps, you need to install addonsu-14.1-arm64-signed.zip
If you want to use f-droid with privilege extension, you need to install org.fdroid.fdroid.privileged.ota_2070.zip9)
Install LineageOS 16.0 over Android 7.1.2
Haven't done it exactly this way - but in the end, it should be the same
- Unlock phone
- Install TWRP 3.2.3-0
- Flash emmc_appsboot.mbn from cm-13.1.2-ZNH2KAS3LG-crackling-signed-fastboot-84f0d5200b.zip to aboot
unzip cm-13.1.2-ZNH2KAS3LG-crackling-signed-fastboot-84f0d5200b.zip emmc_appsboot.mbn
fastboot flash aboot emmc_appsboot.mbn - Boot into recovery (i.e. TWRP)
- Wipe all data partitions (Well … archive all needed data before …)
- Reformat /system with ext4
- Format data
- Reboot
References:
Conversations / adb
How to remove lines from conversations (1.23.4) history:
cd /scratch/peter/Anja/MotoG
mkdir adb-backup
cd adb-backup
adb devices -l
adb backup -f eu.siacs.conversations.ab -apk -obb eu.siacs.conversations
cp -vip eu.siacs.conversations.ab eu.siacs.conversations.ab.save
java -jar ~/Downloads/Android/abe-all.jar unpack eu.siacs.conversations.ab eu.siacs.conversations.tar
cd /tmp
mkdir unpack
cd unpack/
tar -xvkpf /scratch/peter/Anja/MotoG/adb-backup/eu.siacs.conversations.tar
sqlitebrowser apps/eu.siacs.conversations/db/history # remove lines from table "messages"
tar -tf /scratch/peter/Anja/MotoG/adb-backup/eu.siacs.conversations.tar | grep -v 'apps/eu.siacs.conversations/db/history-journal' > files.list
tar -cvf eu.siacs.conversations-modified.tar -T files.list
java -jar ~/Downloads/Android/abe-all.jar pack eu.siacs.conversations-modified.tar eu.siacs.conversations.ab
adb restore eu.siacs.conversations.ab
References:
fastboot boot <imgfile> gave an error and forcing boot into recovery by pressing Power and Volume down did stall on “Wileyfox” screen